Installation and initial setup
Requirements
GET software
As mentioned previously, this DAQ software depends on two of the programs from the GET software
suite: the getEccSoapServer and the dataRouter. These programs are not provided with this package, so they
must be compiled and installed separately before this package can be installed.
Docker
Docker and the Docker Compose tool are required to get the containerized version of the DAQ software running. Docker can be downloaded and installed from its developers’ website or from your package manager if you’re using Linux.
Networking
If you’ll be running the system on multiple computers, be sure to consider where files will be stored. The ECC server will expect to find config files locally wherever it’s running, so if multiple ECC servers are running on multiple computers, you will likely want to share a folder on your local network to keep the config files in.
Source code
Finally, get the latest version of the DAQ software from GitHub:
git clone https://github.com/attpc/attpc-daq.git
Always use the latest version from the Master branch. The version in the Develop branch may not be stable.
Creating the environment file
There are a few environment variables that need to be set to system-dependent values inside the Docker container. Several of these variables provide encryption keys or passwords, so this environment file is not in the Git repository (and it should never be committed to the repository!).
Create a file in the root of the repository with the following values. Remove the comment strings (starting with #)
before saving it.
DAQ_IS_PRODUCTION=True         # Tells the system to use the production settings, rather than debug.
POSTGRES_USER=[something]      # A user name for the PostgreSQL database. Set it to something reasonable.
POSTGRES_PASSWORD=[something]  # A secure, random password that you will not likely need to remember.
POSTGRES_DB=attpcdaq           # The name of the database for PostgreSQL
DAQ_SECRET_KEY=[something]     # A secure, *STRONG* random string for Django's cryptography tools.
The user name for PostgreSQL is not important. Just set it to something reasonable. The remaining two things to be filled in are the PostgreSQL database password and the Django secret key. Set these both to long, random strings of characters since you will not need to remember them.
Warning
Although it may not seem that important to have a strong password on the local network, consider that the Django secret key is used to derive everything cryptography-related in the app. This means that it’s especially important for this key to be both strong and secret.
One way to generate these random strings is the following Python script:
from __future__ import print_function
import random

chars = 'abcdefghijklmnopqrstuvwxyz0123456789!@#$%^&*(-_=+)'
sr = random.SystemRandom()
key = ''.join(sr.choice(chars) for i in range(50))
print(key)
Or, if you prefer a one-liner:
python -c "import random; chars = 'abcdefghijklmnopqrstuvwxyz0123456789%^&*(-_=+)'; sr = random.SystemRandom(); print(''.join(sr.choice(chars) for i in range(50)))"
Building the containers
Once you’ve installed Docker and docker-compose, open a terminal in the root of the repository. This is the
directory with the docker-compose.yml file. The Docker images can then be built with the command:
docker-compose build
This will create a set of Docker images and install all of the software’s dependencies inside them. This will require an internet connection.
Starting the app
Start all of the containers and the virtual network connecting them by running:
docker-compose up
This will instantiate the containers and start them, and then it will start printing the standard output from the
containers. Keep this terminal window running to see the output as the program runs. If you want to quit the program
later, press Control-c in this terminal.
The first time you run the code, it will need to do some housekeeping to get set up. This may take a minute or so. When the output printed to the terminal slows down or stops, continue with the next steps.
First-run setup
When the code is freshly installed, the database that backs the web app will be empty. We need to create a user in the web app so that we can log in and set up an experiment. To do this, open a new terminal and run this command:
docker exec -it attpcdaq_web_1 python manage.py createsuperuser
If we break this command down into parts, it opens a TTY inside the container running the Django app
(docker exec -it attpcdaq_web_1) and runs the Django manage.py script to create a superuser account
(python manage.py createsuperuser). It will prompt you for a username and password, which you should choose
and remember for later.
Once you’ve made a superuser account, open a browser to http://localhost:8080/admin to access the Django admin interface. Log in with the username and password you just set up. This will put you on the Admin page.
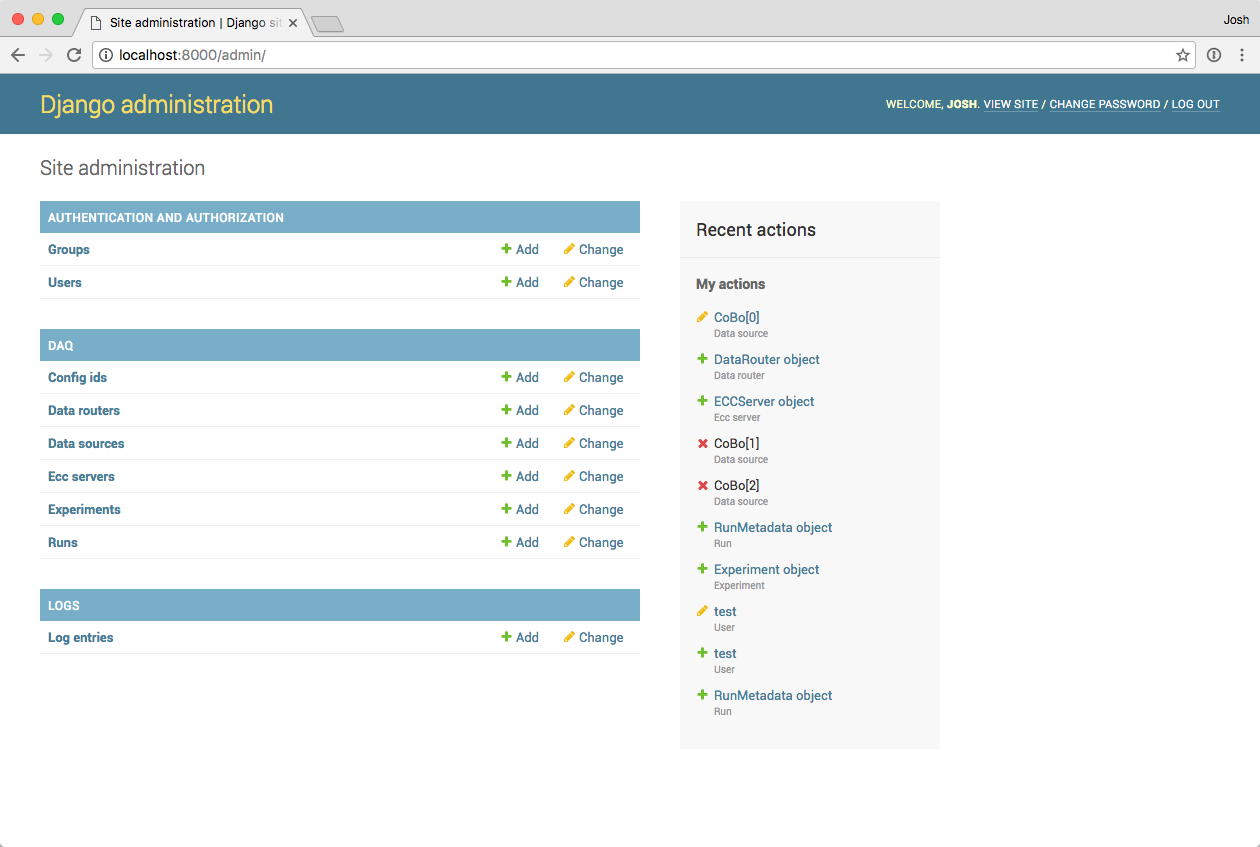
This page allows you to access the internals of the DAQ web interface and directly change the contents of its database. For now, click on “Experiments” under the “DAQ” header and then click the “Add Experiment” button on the next page.
Click the green plus to add a new regular user account.
Note
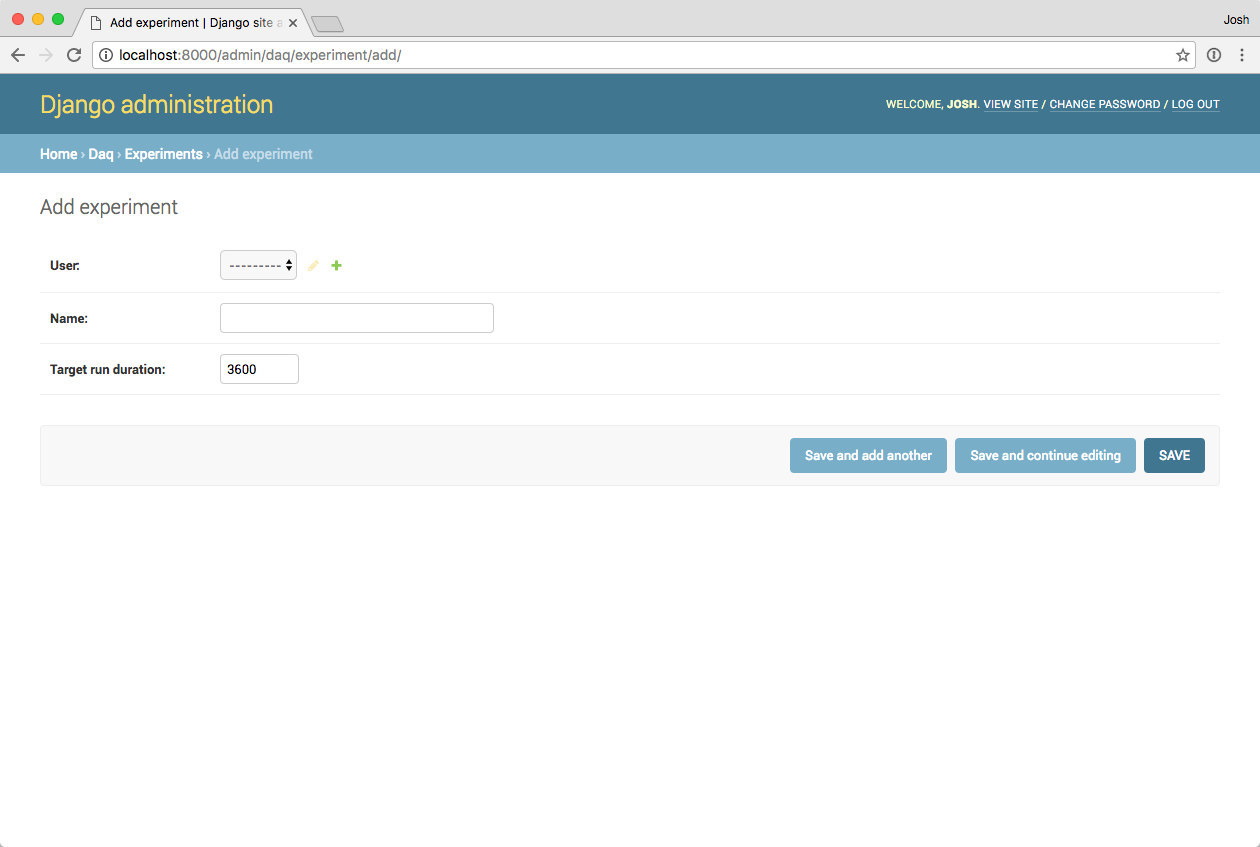
Experiments are associated with user names in a one-to-one mapping in this program, so every time you add an experiment, you should also create a new experimental user to go along with it.
Also enter a name for the experiment. Data will be written into a directory with this name at the end of each run. Spaces are ok in this name. Finally, click “Save” to create the experiment.
Once you’ve finished this, click “Log Out” in the upper right to log out of the admin interface.
Starting the remote processes
Note
This section assumes the code is running on macOS. Linux distributions support a similar method of configuring
a process to automatically launch using systemd services or init scripts, but that will not be covered
here.
Under macOS, the remote GET processes are managed by launchd, the operating system’s main management process.
It will automatically re-launch the processes if they fail, and it will coordinate logging of the processes’ standard
outputs to a log file.
The behavior of launchd with respect to the GET software components is controlled by a Launch Agent plist file.
Example plist files are included in the Git repository, but here is an annotated example for the ECC server:
<?xml version="1.0" encoding="UTF-8"?>
<!DOCTYPE plist PUBLIC "-//Apple//DTD PLIST 1.0//EN" "http://www.apple.com/DTDs/PropertyList-1.0.dtd">
<plist version="1.0">
<dict>
    <!-- A label to identify the program -->
    <key>Label</key>
    <string>attpc.getEccSoapServer</string>

    <!-- Any necessary environment variables. This might include settings for paths
         needed for libraries installed using MacPorts, for example.-->
    <key>EnvironmentVariables</key>
    <dict>
        <key>DYLD_FALLBACK_LIBRARY_PATH</key>
        <string>/opt/local/lib</string>
    </dict>

    <!-- The commands needed to start the program. Each element of the command is given in
         a separate <string> tag. The first element should be the full path to the program,
         and the remaining elements give the command line arguments. -->
    <key>ProgramArguments</key>
    <array>
        <string>/path/to/getEccSoapServer</string>
        <string>--config-repo-url</string>
        <string>/path/to/configs/directory</string>
    </array>

    <!-- The working directory for the program. This is important for the dataRouter as it's
         where that program will write the data. -->
    <key>WorkingDirectory</key>
    <string>/path/to/working/directory</string>

    <!-- Where to write the standard out and standard error files. These may be the same file.
         It is probably best to put the logs in ~/Library/Logs since that will allow you to
         view them with the Console application. -->
    <key>StandardOutPath</key>
    <string>/Users/USER/Library/Logs/getEccSoapServer.log</string>

    <key>StandardErrorPath</key>
    <string>/Users/USER/Library/Logs/getEccSoapServer.log</string>

    <!-- Keep the program running at all times, even if there are no incoming connections. -->
    <key>KeepAlive</key>
    <true/>
</dict>
</plist>
A similar file should be created for the data router with the appropriate arguments.
Once plist files have been created, they are conventionally placed in ~/Library/LaunchAgents, and they should be
launched on startup if they are in that directory. To launch the programs manually, use launchctl:
launchctl load ~/Library/LaunchAgents/attpc.getEccSoapServer.plist
Manually stopping the programs is very similar. Just replace load with unload in the above command.
This can also be automated for all of the remote computers using, e.g. Apple Remote Desktop.